The WPN or Weapon page is one of the most important pages for the Co-Pilot Gunner (CPG). It is used to interact with the weapons and sensors present on the Apache.
The weapon page will give you different options and information depending on the weapon you have selected. It will also show you the quantity of missiles, rockets and 30mm you have onboard. This page has multiple configurations depending on the currently selected weapons systems
Selecting weapons
To view a weapon’s subpage, you select it on the bottom of the MPD (buttons B2,B3,B5). To deselect one, you can click on it again.
When you have a weapon WASed, that weapon’s subpage will always be visible on the WPN page. You cannot select one weapon while another is WASed.
Common information
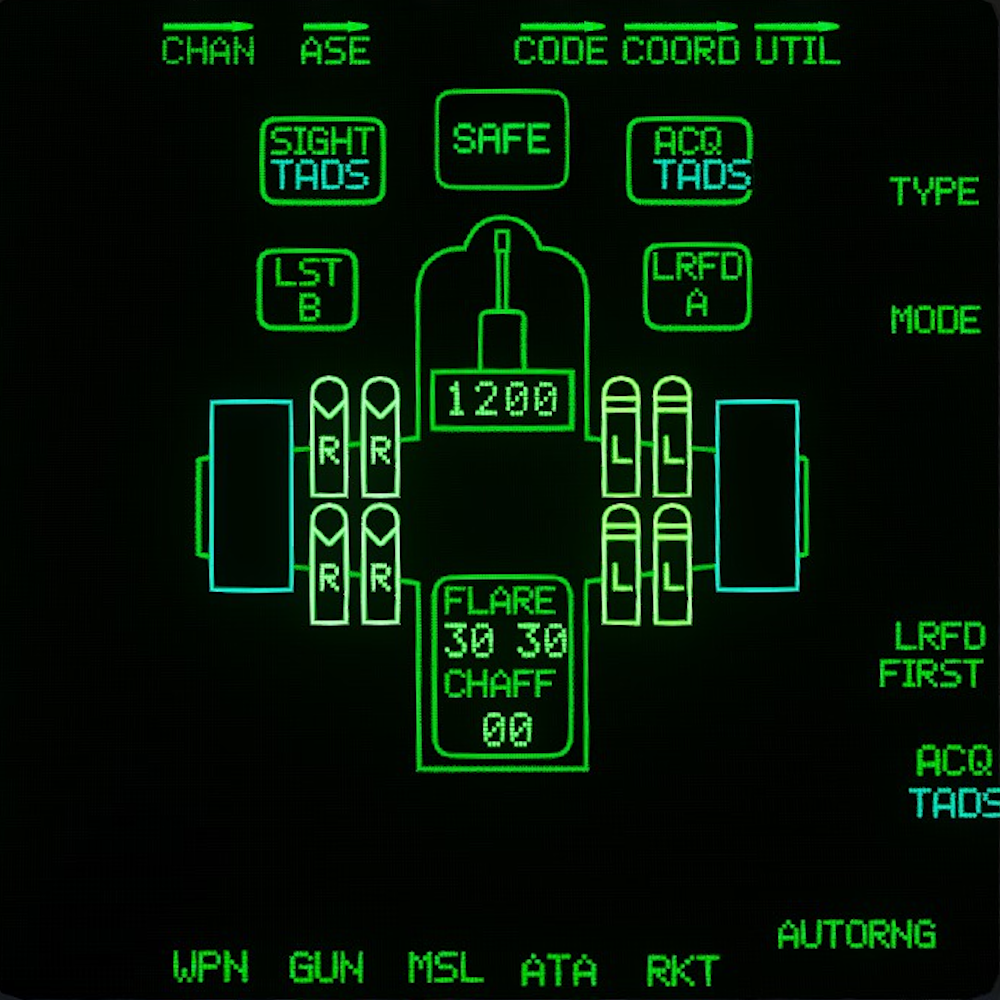
- The arming indicator shows whether the aircraft is armed or safe.
- You can not WAS or are the aircraft while on the ground, to use weapon systems on the ground press the GND ORIDE button on the front left panel(back seat) or top left panel(front seat).
- The sight status box, to the left of the arming indicator, shows you which sight is selected.
- The acquisition source status box shows the currently selected acquisition source (not yet implemented).
- The Laser Spot Tracker box un the sight box shows the current laser code for the Spot tracker.
- The Laser Range Finder box shows the current laser code for the Rangefinder.
- The countermeasures count indication is in the tail of the aircraft, and shows the current armament of countermeasures.
- The LRFD: FIRST button can be pressed to toggle the Laser Rangefinder on/off as opposed to the LRFD keybind which is momentary.
GUN Subpage
The GUN Subpage allows for the modification of the operating parameters of the M230 chaingun
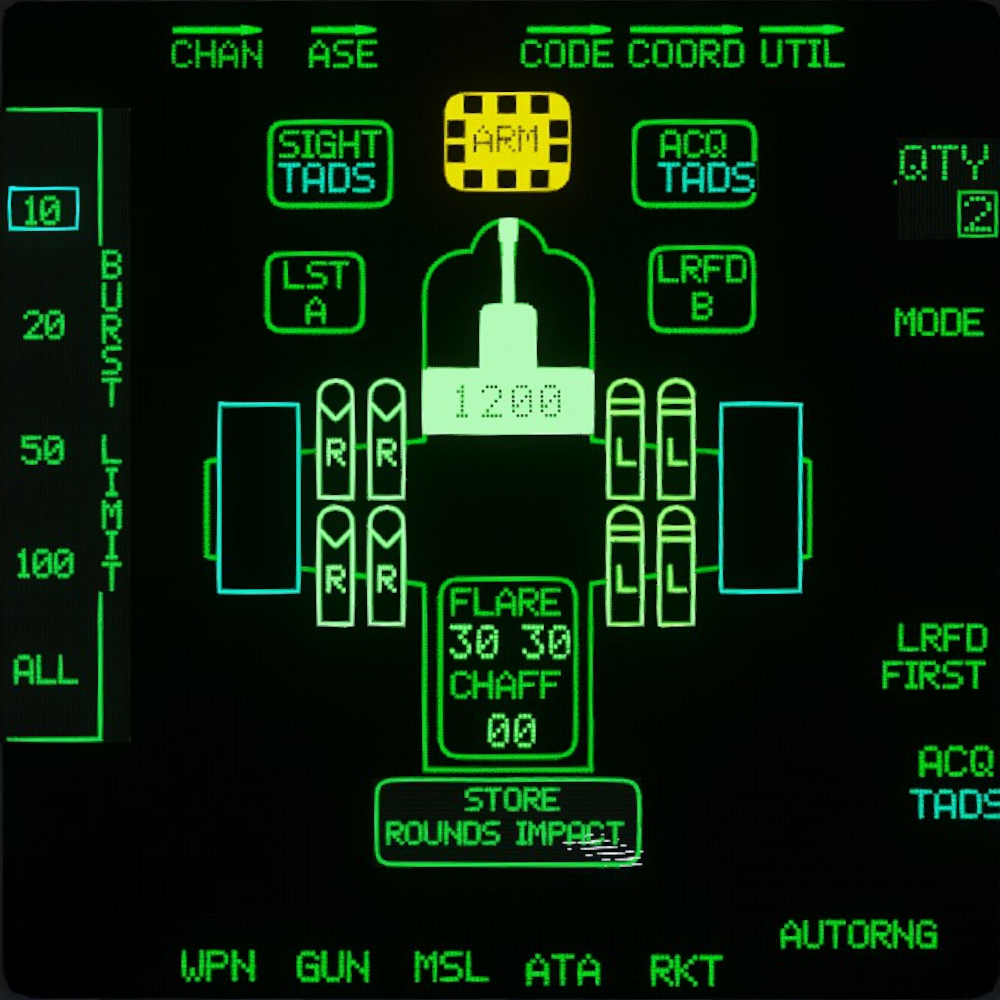
- The current burst settings on the left allow for the selection of a specific burst limit.
- M230 ammo remaining is visible inside the highlighted image of the M230.
MSL Subpage
The MSL Subpage allows for the selection of specific missiles as well as their launch parameters.
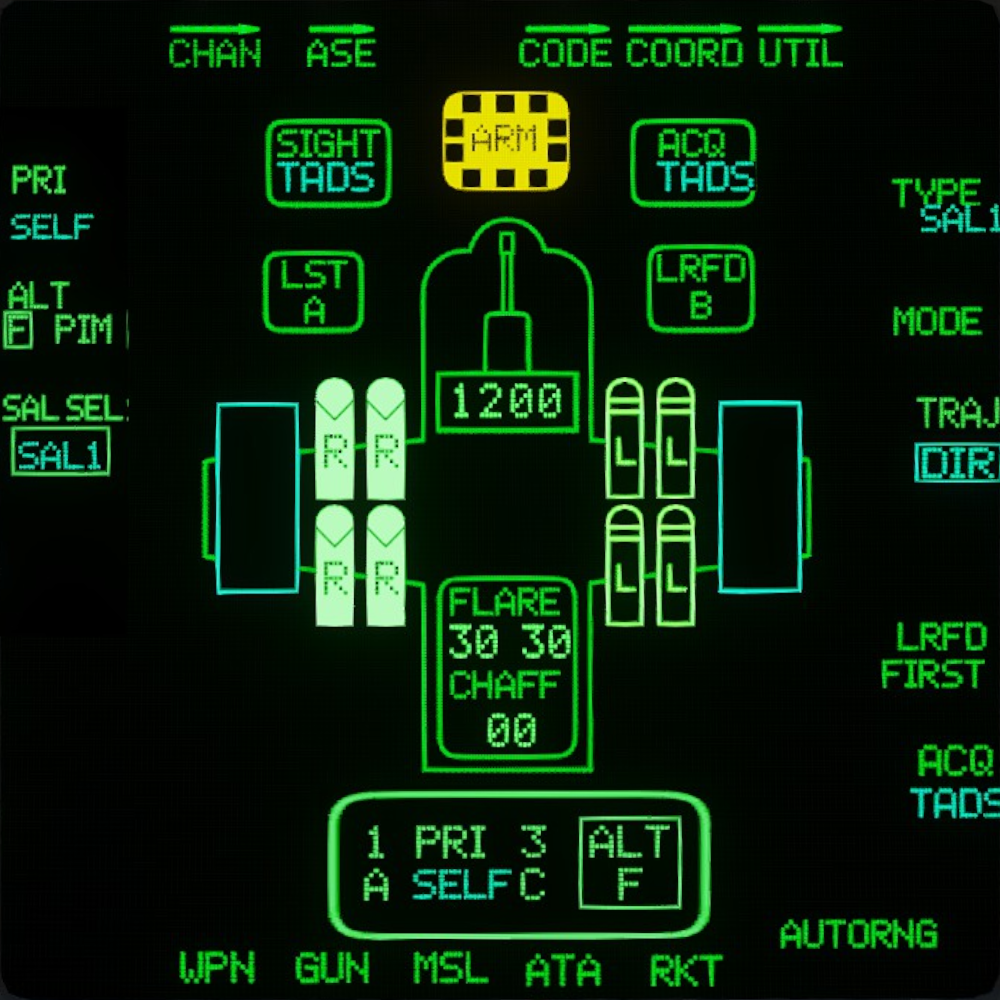
- Each hellfire has an icon specifying its seeker type. This can be used to decide which missile to shoot.
- The hellfire that will be the next launched will be highlighted in inverse video.
- TRAJ (R3) displays the current trajectory, and pressing it will cycle available hellfire trajectories.
- SAL SEL (L3) will cycle the different missile types.
- PRI (L1) shows the currently selected primary laser code.
- ALT (L2) shows the currently selected secondary laser code.
- Unselected laser hellfires show L for laser and RF has no letter.
- When selected a hellfire will show 2 letters, top letter is the Primary laser code it will look for and bottom is R for ready to shoot. Note: RF hellfires only show R as they dont need a laser.
- There is no way to tell the difference between K, K2A and N hellfires from this page, when using multiple types of SAL 2 hellfires you just need to remember what is where.
The different types of hellfires availible
| Type | SAL | Warhead | Range |
|---|---|---|---|
| FA | SAL 1 | 18lb Tandem HEAT w/ frag sleeve | 7km |
| K | SAL 2 | 20lb Tandem HEAT | 8km |
| K2A | SAL 2 | 20lb Tandem HEAT w/ frag sleeve | 8km |
| L | RF | 20lb Tandem HEAT | 8km |
| N | SAL 2 | Thermobaric | 8km |
The AH-64D classifies missiles on-screen using the missile’s icons:
| Type | Description | Icon |
|---|---|---|
| SAL1 | Semi active laser generation 1 | |
| SAL2 | Semi active laser generation 2 | |
| RF | Radio frequency - Fire and forget Millimeter-Wave radar |
Rocket Subpage
The RKT Subpage allows for the selection of specific rocket types from the available inventory, along with allowing for specific launch parameters to be set.
| Type | Description | Icon |
|---|---|---|
| M151 | 10lb HEDP | 6PD |
| M255A1 | 1000x 60gr FLEC | 6FL |
| M261 | 9x 13lb MPSM | 6MP |
| M257 | Illum flare 100 secs | 6IL |
| M278 | IR Illum flare 100 secs | 6IR |
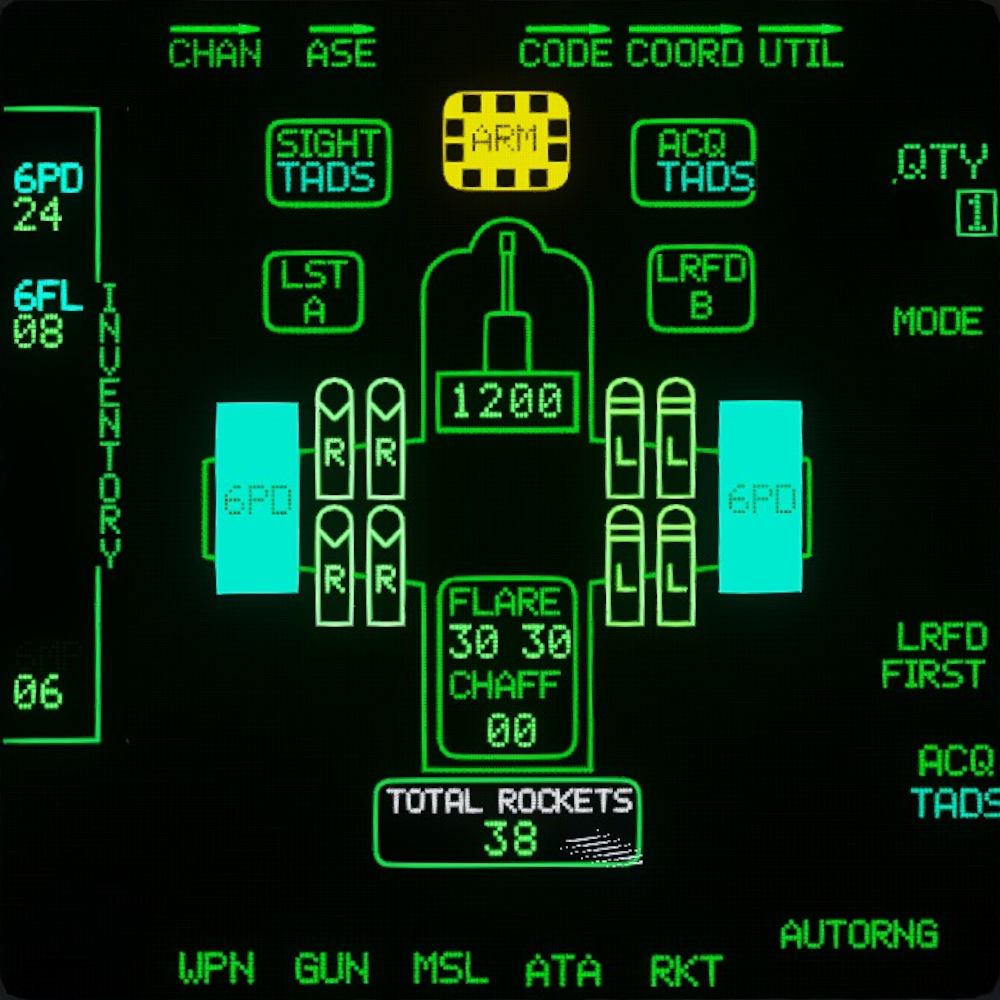
- On the left is the aircraft’s inventory, which shows all available rocket types. Clicking on a rocket type will select that rocket type.
- Rocket types cannot be mixed in the same zones for pylons 1/4, and 2/3, except for zone 3 which needs to be the same (or empty) across all pylons. E.g.: if you put 6PD in zone 1 for pylon 1 then zone 1 for pylon 4 needs to be either empty or 6PD.
- The selected rocket type is displayed on the pods holding that rocket type.
- For each pod zone 1 is 12 rockets, zone 2 is 4 rockets and zone3 3 is 3 rockets
- Salvo Quantity (R1) shows the number of rockets that will be fired in a single trigger pull. This can be 1,2,4,8,12,24 or ALL.
- Total avalible rockets are displayed at the botom of the page.
- The Rocket steering cursor represents the elevation limits of the rocket pods, +4 to -15 degrees.
CODE Subpage
You can access the Code page by pressing CODE (T4). The Code page displays all current laser channels and their respective laser frequency. You can cycle between LRFD and LST codes by pressing (T2). The currently selected channel is the channel that the selected tool in the top (T2) will use. Laser frequenies can be changed by pressing FREQ (T5) and selecting a channel then using the KU to set the frequency.
 STILL NEED IMAGE OF CODE PAGE